Wednesday, February 19, 2014

Florida Trip

So today I am finally writing about our trip to Florida. We just have been so busy that I haven't got around to it.

             We went November 15 through the 24th (see how far behind I am?) We had a lot of fun!

The highlight of our trip was Sea world


 We got to feed stingrays, one of them                                There was side-street shows.....
crawled up
Mom's arm!!


There was even a pet show with car driving dogs and lever pulling cats
 
We had a lot of fun there!!!!

We swam in the pool almost everyday


                                                 We loved going to the Orlando Science Center!!!

                                                      Here we are in the hurricane simulator                                                                              

Friday, November 8, 2013

Beanie Boo Fashion Project


On Thursday I got a hole in my sock and I had just got a Beanie Boo (the adorable things in the pic)
So Adi and I made a sweater, wrist warmers, and a hat ( the one in the middle is wearing it)
We had so much fun doing it we did 2 others. We have 2 more to go, but we decided to do a fashion show for our mom and dad. they liked Giraffe the best...


This cute puppy has on a rain coat and boots made from a surgical glove
As you can see it didn't work that well, he's missing a boot.


This little guy only got a vest 'cuz his 
arms are too short.


And now the best for last 


Wednesday, November 6, 2013

Makenzie's Science - The Scribble Machine


On Saturday Dad and I made a contraption that I call "The scribble machine"
I found the original plans on instructables.com but we made a few modifications...


First from an old computer that I had taken apart, we snapped 3 blades off a fan to make it wiggle

Next through holes in the corners, I attached markers with zip ties

For the power source, we used a car battery charger and connected the wires to the clamps....


After that we discovered that to turn it off you had to unplug it, so Dad put a button in the circuit


Here are a few tips if you make a Scribble Machine,
Don't let the negative and positive clamps touch, the fan will burn up.
So this does not happen, wrap at least one clamp in electrical tape. 
DO NOT put your finger in it while it's running!!!!!
Bad things will happen.


Sunday, February 12, 2012

Electrical

Another contractor we are very pleased with is Erlandson Electric.  Unfortunately, most of the electrical work is covered up. 
As you can see in the mechanical room, the wires are all installed in an orderly fashion.  This was the case thoughout the project, even though no one will see it. 


Holes in the joists are in nice straight lines.

Note the spray foam insulation in the rim joist area.  ~2" of foam was also applied to the ceiling as an air seal.  R50 cellulose will be blown in on top of the foam to complete the insulation.

The well pump is set up to provide "constant pressure" by using a VFD.  The connection of the drive is another example of the professional workmanship done by Don and Chance.


Deck Goes On

There were some delays with the siding.  Turns out the company that offered the color we liked for the siding did not offer prefinished trim. 
We were able to find a close match from a second supplier. However, getting samples from both suppliers to confirm colors before took some time. 

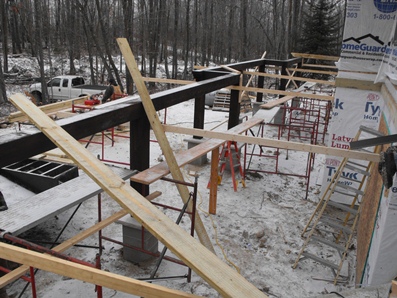
Clafton Builders took advantage of the weather and the delay with the siding to put the deck on starting just before Christmas (yes, the first photo below was taken on Dec. 22nd). 


I purchased rough sawn cedar 8 x 8's then precut and stained them in the garage at Snowball.  Pictures of cutting beams will be posted separately.  


Deck joists are treated.  Ends are trimmed similar to beams.  These were also cut in the garage at Snowball. 

Decking is 5/4 cedar.

Herring bone pattern where deck turns corner by main entry.  Joe routered the ends of the boards to match the factory round-over on the edges.

We wanted a hidden fastener system for the decking.  After much research, I selected "Camo" system.  The tool above is used to "toe screw" the decking to the joists.  By pulling up on the handle, the jaws open enough to fit over the board.  Releasing the handle allows the jaws to clamp down on the sides of the board.  The jaws also space the boards at 3/16".

There are screw guides on each end of the tool (red arrow above) that position special screws at the correct angle and position.  The accompanying driver has a shoulder that limits the depth of the screws. 

Close up of the screw after installation. 

Joe had not used this system before this project, but quickly got the hang of it.  I ended up ordering a second tool to keep the deck moving along nicely. 

Siding Update

Siding is basically complete!! 
The weather has continued to be very cooperative.  Joe Clafton and his crew at Clafton Builders have been doing a great job on this project.  Clafton Builders has been the main contractor, handling all the "carpentry" tasks...framing, sheathing, roofing, deck, siding, window and door installation, etc.  Their workmanship is top notch.  Communication with Clafton's has also been a pleasure.


You will see more of Clafton's work in future posts (of previous steps in the process).

Wednesday, February 1, 2012

Stone Work

Stone veneer was installed around the main entrance door and garage doors.  Greg Ewen and his crew at Ewen Stone Works put up a temporary shelter and heated the areas during the ~3 days that it took to install and grout the stone. 


You can also see the garage doors that got installed on Monday, January 30th.  Rapid Garage Door sold us the Clopay doors and LiftMaster belt drive openers.  The installation also included a double climate seal that looks like it will work great at keeping out the elements.